Bonjour à tous !
Aujourd’hui un petit tuto de base pour installer Centreon 2.7 (La version que vous pouvez voir sur CES 3.3)
Cette version est (selon moi) tout simplement magnifique, vous êtes prêt ?
Alors vous venez de finir votre installation de Debian 8, vous avez votre mot de passe root en main, vous avez installer le serveur ssh (apt-get install openssh-server) et venez juste de vous connecter en ssh à votre serveur, nous allons pouvoir commencer :
Connectez-vous avec le compte root :
su
Lançons la mise à jour des packets Debian pour commencer :
apt-get update
apt-get upgrade
Installation des packets de base nécessaire à la compilation :
apt-get install build-essential cmake -y
Installation de la librairie Centreon :
cd /usr/local/src
wget https://s3-eu-west-1.amazonaws.com/centreon-download/public/centreon-clib/centreon-clib-1.4.2.tar.gz
tar xzf centreon-clib-1.4.2.tar.gz
cd centreon-clib-1.4.2/build
Préparation de la compilation :
cmake
       -DWITH_TESTING=0
       -DWITH_PREFIX=/usr
       -DWITH_SHARED_LIB=1
       -DWITH_STATIC_LIB=0
       -DWITH_PKGCONFIG_DIR=/usr/lib/pkgconfig .
Vous devriez avoir comme résultat :
-- Configuration Summary
-- ---------------------
--
--   Project
--     - Name                      Centreon Clib
--     - Version                   1.4.2
--     - With shared library       Yes
--     - With static library       No
--
--   System
--     - Name                      Linux
--     - Version                   3.2.0-4-amd64
--     - Processor                 x86_64
--
--   Build
--     - Compiler                  /usr/bin/c++ (GNU)
--     - Extra compilation flags
--     - Build unit tests          No
--
--   Installation
--     - Prefix                    /usr
--     - Library directory         /usr/lib
--     - Include directory         /usr/include
--     - Package                   None
--     - pkg-config directory      /usr/lib/pkgconfig
--
-- Configuring done
-- Generating done
-- Build files have been written to: /usr/local/src/centreon-clib-1.4.2/build
Nous allons maintenant compiler la librairie :
make
make install
Installation des connecteurs Perl et SSH optionnels pour Centreon (Fortement conseiller car ils améliorent la vitesse d’exécution des plugins Perl, ils ne sont utilisable qu’avec Centreeon Engine)
Installation des packets de base nécessaire à Perl Connector :
apt-get install libperl-dev -y
Installation de la librairie Perl Connector :
cd /usr/local/src
wget https://s3-eu-west-1.amazonaws.com/centreon-download/public/centreon-connectors/centreon-connector-1.1.2.tar.gz
tar xzf centreon-connector-1.1.2.tar.gz
cd centreon-connector-1.1.2/perl/build
Préparation de la compilation :
cmake
  -DWITH_PREFIX=/usr
  -DWITH_PREFIX_BINARY=/usr/lib/centreon-connector
  -DWITH_CENTREON_CLIB_INCLUDE_DIR=/usr/include
  -DWITH_TESTING=0 .
Vous devriez avoir comme résultat :
-- Configuration Summary
-- ---------------------
--
--   Project
--     - Name                       Centreon Perl Connector
--     - Version                    1.1.2
--
--   System
--     - Name                       Linux
--     - Version                    3.16.0-4-amd64
--     - Processor                  x86_64
--
--   Build
--     - Compiler                   /usr/bin/c++ (GNU)
--     - Extra compilation flags      -D_REENTRANT -D_GNU_SOURCE -DDEBIAN -fwrapv -fno-strict-aliasing -pipe -I/usr/local/include -D_LARGEFILE_SOURCE -D_FILE_OFFSET_BITS=64  -I/usr/lib/x86_64-linux-gnu/perl/5.20/CORE
--     - Unit tests                 disabled
--
--   Install
--     - Prefix                     /usr
--     - Binary prefix              /usr/lib/centreon-connector
--     - Package                    None
--
--   Libraries
--     - clib include directory     /usr/include
--     - clib library directory     /usr/lib/libcentreon_clib.so
-- Configuring done
-- Generating done
-- Build files have been written to: /usr/local/src/centreon-connector-1.1.2/perl/build
Nous allons maintenant compiler la librairie :
make
make install
Installation des packets de base nécessaire à SSH Connector :
apt-get install libssh2-1-dev libgcrypt11-dev -y
Installation de la librairie SSH Connector :
Préparation de la compilation :
cd /usr/local/src/centreon-connector-1.1.2/ssh/build
cmake
  -DWITH_PREFIX=/usr
  -DWITH_PREFIX_BINARY=/usr/lib/centreon-connector
  -DWITH_CENTREON_CLIB_INCLUDE_DIR=/usr/include
  -DWITH_TESTING=0 .
Vous devriez avoir comme résultat :
-- Configuration Summary
-- ---------------------
--
--   Project
--     - Name                       Centreon SSH Connector
--     - Version                    1.1.2
--     - Known hosts check          disabled
--
--   System
--     - Name                       Linux
--     - Version                    3.16.0-4-amd64
--     - Processor                  x86_64
--
--   Build
--     - Compiler                   /usr/bin/c++ (GNU)
--     - Extra compilation flags
--     - Unit tests                 disabled
--
--   Install
--     - Prefix                     /usr
--     - Binary prefix              /usr/lib/centreon-connector
--     - Package                    None
--
--   Libraries
--     - clib include directory     /usr/include
--     - clib library directory     /usr/lib/libcentreon_clib.so
-- Configuring done
-- Generating done
-- Build files have been written to: /usr/local/src/centreon-connector-1.1.2/ssh/build
Nous allons maintenant compiler la librairie :
make
make install
Installation de Centreon Engine :
Nous allons commencer par créer l’user/group pour centreon-engine :
groupadd -g 6001 centreon-engine
useradd -u 6001 -g centreon-engine -m -r -d /var/lib/centreon-engine -c "Centreon-engine Admin" -s /bin/bash centreon-engine
Installation des packets de base nécessaire à centreon-engine :
apt-get install libcgsi-gsoap-dev zlib1g-dev libssl-dev libxerces-c-dev -y
Installation de centreon-engine :
cd /usr/local/src
wget https://s3-eu-west-1.amazonaws.com/centreon-download/public/centreon-engine/centreon-engine-1.4.15.tar.gz
wget https://s3-eu-west-1.amazonaws.com/centreon-download/public/centreon-engine/centreon-engine-1.5.0.tar.gz
tar xzf centreon-engine-1.4.15.tar.gz
tar xzf centreon-engine-1.5.0.tar.gz
cd centreon-engine-1.4.15/build/
cd centreon-engine-1.5.0/build/
Préparation de la compilation :
cmake
    -DWITH_CENTREON_CLIB_INCLUDE_DIR=/usr/include
    -DWITH_CENTREON_CLIB_LIBRARY_DIR=/usr/lib
    -DWITH_PREFIX=/usr
    -DWITH_PREFIX_BIN=/usr/sbin
    -DWITH_PREFIX_CONF=/etc/centreon-engine
    -DWITH_USER=centreon-engine
    -DWITH_GROUP=centreon-engine
    -DWITH_LOGROTATE_SCRIPT=1
    -DWITH_VAR_DIR=/var/log/centreon-engine
    -DWITH_RW_DIR=/var/lib/centreon-engine/rw
    -DWITH_STARTUP_DIR=/etc/init.d
    -DWITH_PKGCONFIG_SCRIPT=1
    -DWITH_PKGCONFIG_DIR=/usr/lib/pkgconfig
    -DWITH_TESTING=0
    -DWITH_WEBSERVICE=1 .
Vous devriez avoir comme résultat :
-- Configuration Summary
-- ---------------------
--
--   Project
--     - Name                        Centreon Engine
--     - Version                     1.5.0
--
--   System
--     - Name                        Linux
--     - Version                     3.16.0-4-amd64
--     - Processor                   x86_64
--
--   Build
--     - Compiler                    /usr/bin/c++ (GNU)
--     - Extra compilation flags
--     - Build static core library   yes
--     - External commands module    enabled
--     - Webservice module           enabled
--     - Unit tests                  disabled
--     - pkg-config script           enabled
--     - logrotate script            enabled
--     - Startup script              SysV-style script
--
--   Install
--     - Prefix                      /usr
--     - Binary prefix               /usr/sbin
--     - Configuration prefix        /etc/centreon-engine
--     - Library prefix              /usr/lib/centreon-engine
--     - Include prefix              /usr/include/centreon-engine
--     - var directory               /var/log/centreon-engine
--     - Log archive directory       /var/log/centreon-engine/archives
--     - RW directory                /var/lib/centreon-engine/rw
--     - Lock prefix                 /var/lock/centengine.lock
--     - pkg-config directory        /usr/lib/pkgconfig
--     - logrotate directory         /etc/logrotate.d
--     - Startup directory           /etc/init.d
--     - User                        centreon-engine
--     - Group                       centreon-engine
--     - Package                     None
--
--   Libraries
--     - clib include directory      /usr/include
--     - clib library directory      /usr/lib/libcentreon_clib.so
-- Configuring done
-- Generating done
-- Build files have been written to: /usr/local/src/centreon-engine-1.5.0/build
Nous allons maintenant compiler la librairie :
make
make install
Vérifions maintenant que centreon-engine est correctement installé :
centengine -V
Vous devriez avoir comme résultat :
[1450348876] [9171] Centreon Engine 1.5.0
[1450348876] [9171]
[1450348876] [9171] Copyright 1999-2009 Ethan Galstad
[1450348876] [9171] Copyright 2009-2010 Nagios Core Development Team and Community Contributors
[1450348876] [9171] Copyright 2011-2015 Merethis
[1450348876] [9171]
[1450348876] [9171] This program is free software: you can redistribute it and/or
[1450348876] [9171] modify it under the terms of the GNU General Public License version 2
[1450348876] [9171] as published by the Free Software Foundation.
[1450348876] [9171]
[1450348876] [9171] Centreon Engine is distributed in the hope that it will be useful,
[1450348876] [9171] but WITHOUT ANY WARRANTY; without even the implied warranty of
[1450348876] [9171] MERCHANTABILITY or FITNESS FOR A PARTICULAR PURPOSE. See the GNU
[1450348876] [9171] General Public License for more details.
[1450348876] [9171]
[1450348876] [9171] You should have received a copy of the GNU General Public License
[1450348876] [9171] along with this program. If not, see
[1450348876] [9171] <http://www.gnu.org/licenses/>.
Paramétrons centreon-engine pour qu’il démarre automatiquement :
update-rc.d centengine defaults
Installation des Plugins pour Centreon-Engine :
Installation des packets de base nécessaire aux Plugins de centreon-engine :
apt-get install libgnutls28-dev libssl-dev libkrb5-dev libldap2-dev libsnmp-dev gawk libwrap0-dev libmcrypt-dev smbclient fping gettext dnsutils libmysqlclient-dev -y
Téléchargement des Plugins Nagios :
cd /usr/local/src
wget http://nagios-plugins.org/download/nagios-plugins-2.1.1.tar.gz
tar -xzf nagios-plugins-2.1.1.tar.gz
cd nagios-plugins-2.1.1
Installation des Plugins Nagios :
./configure --with-nagios-user=centreon-engine --with-nagios-group=centreon-engine --prefix=/usr/lib/nagios/plugins --libexecdir=/usr/lib/nagios/plugins --enable-perl-modules --with-openssl=/usr/bin/openssl
make
make install
Installation des Plugins pour Centreon :
Installation des packets de base nécessaire aux Plugins de Centreon :
apt-get install libxml-libxml-perl libjson-perl libwww-perl libxml-xpath-perl libnet-telnet-perl libnet-ntp-perl libnet-dns-perl libdbi-perl libdbd-mysql-perl libdbd-pg-perl -y
Installation de git nécessaire à la récupération des plugins Centreon sur leurs github :
apt-get install git-core
Récupération des Plugins Centreon sur Github :
cd /usr/local/src
git clone https://github.com/centreon/centreon-plugins.git
Installation des Plugins Centreon :
cd centreon-plugins
chmod +x centreon_plugins.pl
cp -R * /usr/lib/nagios/plugins/
Installation de Centreon-Broker :
Nous allons commencer par créer l’user/group pour centreon-broker :
groupadd -g 6002 centreon-broker
useradd -u 6002 -g centreon-broker -m -r -d /var/lib/centreon-broker -c "Centreon-broker Admin"  -s /bin/bash centreon-broker
Ajout de l’user centreon-engine au groupe centreon-broker :
usermod -aG centreon-broker centreon-engine
Installation des packets de base nécessaire à Centreon-Broker :
apt-get install librrd-dev libqt4-dev libqt4-sql-mysql libgnutls28-dev lsb-release -y
Téléchargement de Centreon-Broker :
cd /usr/local/src
���wget https://s3-eu-west-1.amazonaws.com/centreon-download/public/centreon-broker/centreon-broker-2.10.1.tar.gz
wget https://s3-eu-west-1.amazonaws.com/centreon-download/public/centreon-broker/centreon-broker-2.11.0.tar.gz
tar xzf centreon-broker-2.10.1.tar.gz
tar xzf centreon-broker-2.11.0.tar.gz
cd /usr/local/src/centreon-broker-2.10.1/build/
cd centreon-broker-2.11.0/
Préparation de la compilation :
cmake
    -DWITH_DAEMONS='central-broker;central-rrd'
    -DWITH_GROUP=centreon-broker
    -DWITH_PREFIX=/usr
    -DWITH_PREFIX_BIN=/usr/sbin
    -DWITH_PREFIX_CONF=/etc/centreon-broker
    -DWITH_PREFIX_LIB=/usr/lib/centreon-broker
    -DWITH_PREFIX_MODULES=/usr/share/centreon/lib/centreon-broker
    -DWITH_STARTUP_DIR=/etc/init.d
    -DWITH_STARTUP_SCRIPT=auto
    -DWITH_TESTING=0
    -DWITH_USER=centreon-broker .
Vous devriez avoir comme résultat :
-- Configuration Summary
-- ---------------------
--
--   Project
--     - Name                       Centreon Broker
--     - Version                    2.11.0
--
--   System
--     - Name                       Linux
--     - Version                    3.16.0-4-amd64
--     - Processor                  x86_64
--
--   Build
--     - Compiler                   /usr/bin/c++ (GNU)
--     - Extra compilation flags
--     - Qt                         4.8.6
--     - Unit tests                 disabled
--     - Startup script             sysv
--     - Module                     stats, neb, file, compression, correlation, dumper, rrd, sql, storage, influxdb, graphite, bam, tcp, tls, bbdo, ndo
--
--   Install
--     - Prefix                     /usr
--     - Binary prefix              /usr/sbin
--     - Library prefix             /usr/lib/centreon-broker
--     - Modules prefix             /usr/share/centreon/lib/centreon-broker
--     - Include prefix             /usr/include/centreon-broker
--     - Configuration prefix       /etc/centreon-broker
--     - Startup dir                /etc/init.d
--     - User                       centreon-broker
--     - Group                      centreon-broker
--     - Package                    None
--
-- Configuring done
-- Generating done
-- Build files have been written to: /usr/local/src/centreon-broker-2.11.0/build
Nous allons maintenant compiler Centreon-Broker :
make
make install
ATTENTION !! Avec la nouvelle version 2.7 de Centreon est apparu un nouveau module dumber (05-dumper.so) alors que les précédentes versions utilisaient le module stat (15-stats.so), il entre en conflit avec le nouveau module et provoque l’arrêt du processus cbd quand on va sur la page des statistiques. Nous allons donc supprimer l’ancien module stats :
rm /usr/local/centreon-broker/lib/centreon-broker/05-stats.so
Paramétrons centreon-broker pour qu’il démarre automatiquement :
update-rc.d cbd defaults
Installation de SNMP :
Installation des packets de base nécessaire pour le protocole SNMP :
apt-get install snmp snmpd snmptrapd libnet-snmp-perl libsnmp-perl -y
Paramétrage du daemon SNMP :
Nous allons éditer le fichier : /etc/snmp/snmpd.conf
nano /etc/snmp/snmpd.conf
Modifiez le fichier pour avoir :
agentAddress udp:localhost:161
rocommunity public localhost

iquerySecName   internalUser

trapsink        localhost       public
Nous allons réduire la verbosité du daemon snmpd :
nano /etc/default/snmpd
Modifiez le fichier pour avoir :
# snmpd options (use syslog, close stdin/out/err).
SNMPDOPTS='-LS4d -Lf /dev/null -u snmp -g snmp -I -smux,mteTrigger,mteTriggerConf -p /run/snmpd.pid'
Nous allons maintenant ajouter la réception de traps snmp :
nano /etc/default/snmptrapd
Modifiez le fichier pour avoir :
TRAPDRUN=yes

# snmptrapd options (use syslog).
TRAPDOPTS='-On -Lsd -p /run/snmptrapd.pid'
Installation des MIBS SNMP :
Nous allons modifier le fichier de configuration des sources de dépots debian pour ajouter les dépots « non-free »:
Nous allons éditer le fichier : /etc/apt/sources.list
nano /etc/apt/sources.list
Ajoutez à la fin du fichier :
#DEPOTS NON-FREE
deb http://ftp.fr.debian.org/debian/ jessie main non-free
deb-src http://ftp.fr.debian.org/debian/ jessie main non-free
Mettez à jour vos dépots :
apt-get update
Installation des MIBS :
apt-get install snmp-mibs-downloader -y
Créez un lien de vos MIBS :
ln -s /usr/share/mibs/ /usr/share/snmp/mibs
Editez le fichier : /etc/default/snmpd
nano /etc/default/snmpd
Puis modifiez le pour avoir :
export MIBDIRS=/usr/share/mibs
export MIBS=ALL
Editez le fichier : /etc/snmp/snmp.conf
nano /etc/snmp/snmpd.conf
Commentez la ligne :
Redémarrons les services SNMP :
service snmpd restart
service snmptrapd restart
Testons le service SNMP :
snmpwalk -c public -v 2c localhost
Si le service est correctement paramétré vous verrez toutes les OID déflier :
...
NOTIFICATION-LOG-MIB::nlmLogDateAndTime."default".1 = STRING: 2015-12-16,18:0:55.0,+1:0
NOTIFICATION-LOG-MIB::nlmLogEngineID."default".1 = ""
NOTIFICATION-LOG-MIB::nlmLogContextEngineID."default".1 = ""
NOTIFICATION-LOG-MIB::nlmLogContextName."default".1 = STRING:
NOTIFICATION-LOG-MIB::nlmLogNotificationID."default".1 = OID: SNMPv2-MIB::coldStart
NOTIFICATION-LOG-MIB::nlmLogVariableID."default".1.1 = OID: DISMAN-EVENT-MIB::sysUpTimeInstance
NOTIFICATION-LOG-MIB::nlmLogVariableID."default".1.2 = OID: SNMP-COMMUNITY-MIB::snmpTrapAddress.0
NOTIFICATION-LOG-MIB::nlmLogVariableID."default".1.3 = OID: SNMPv2-MIB::snmpTrapEnterprise.0
NOTIFICATION-LOG-MIB::nlmLogVariableValueType."default".1.1 = INTEGER: timeTicks(3)
NOTIFICATION-LOG-MIB::nlmLogVariableValueType."default".1.2 = INTEGER: ipAddress(5)
NOTIFICATION-LOG-MIB::nlmLogVariableValueType."default".1.3 = INTEGER: objectId(7)
NOTIFICATION-LOG-MIB::nlmLogVariableTimeTicksVal."default".1.1 = Timeticks: (1) 0:00:00.01
NOTIFICATION-LOG-MIB::nlmLogVariableIpAddressVal."default".1.2 = IpAddress: 192.168.92.18
NOTIFICATION-LOG-MIB::nlmLogVariableOidVal."default".1.3 = OID: NET-SNMP-MIB::netSnmpAgentOIDs.10
Installation de Centreon UI :
Nous allons commencer par créer l’user/group pour Centreon UI:
groupadd -g 6000 centreon
useradd -u 6000 -g centreon -m -r -d /var/lib/centreon -c "Centreon Admin" -s /bin/bash centreon
Installation des packets de base nécessaire à Centreon UI :
apt-get install sudo tofrodos bsd-mailx lsb-release mariadb-server libmysqlclient-dev apache2 apache2-mpm-prefork php5 php5-mysql php-pear php5-ldap php5-snmp php5-gd rrdtool librrds-perl libconfig-inifiles-perl libcrypt-des-perl libdigest-hmac-perl libdigest-sha-perl libgd-gd2-perl php5-sqlite -y
Téléchargement de Centreon UI :
cd /usr/local/src
wget https://s3-eu-west-1.amazonaws.com/centreon-download/public/centreon/centreon-2.6.4.tar.gz
tar xzf centreon-2.6.4.tar.gz
cd centreon-2.6.4
Installation de Centreon UI :
./install.sh -i
Au lancement, le script vérifie que toutes les dépendances sont bien présentes :
###############################################################################
#                                                                             #
#                         Centreon (www.centreon.com)                         #
#                          Thanks for using Centreon                          #
#                                                                             #
#                                    v2.6.4                                   #
#                                                                             #
#                               infos@centreon.com                            #
#                                                                             #
#                   Make sure you have installed and configured               #
#                   sudo - sed - php - apache - rrdtool - mysql               #
#                                                                             #
###############################################################################
------------------------------------------------------------------------
	Checking all needed binaries
------------------------------------------------------------------------
rm                                                         OK
cp                                                         OK
mv                                                         OK
/bin/chmod                                                 OK
/bin/chown                                                 OK
echo                                                       OK
more                                                       OK
mkdir                                                      OK
find                                                       OK
/bin/grep                                                  OK
/bin/cat                                                   OK
/bin/sed                                                   OK

You will now read Centreon Licence.
	Press enter to continue.
Pressez la touche enter, ensuite la licence d’utilisateur s’affiche :
This General Public License does not permit incorporating your program into
proprietary programs.  If your program is a subroutine library, you may
consider it more useful to permit linking proprietary applications with the
library.  If this is what you want to do, use the GNU Library General
Public License instead of this License.

Do you accept GPL license ?
[y/n], default to [n]:
> y
Pressez la touche y et enter. Le script d’installation va ensuite vous demander si vous souhaitez installer différents modules :
------------------------------------------------------------------------
        Please choose what do you want to install
------------------------------------------------------------------------

Do you want to install Centreon Web Front
[y/n], default to [n]:
> y

Do you want to install Centreon CentCore
[y/n], default to [n]:
> y

Do you want to install Centreon Nagios Plugins
[y/n], default to [n]:
> y

Do you want to install Centreon Snmp Traps process
[y/n], default to [n]:
> y
Le script va maintenant installé les différents modules précédemment sélectionné, le script vous demande maintenant le chemin d’installation pour Centreon UI :
------------------------------------------------------------------------
        Start CentWeb Installation
------------------------------------------------------------------------

Where is your Centreon directory?
default to [/usr/local/centreon]
>/usr/share/centreon
Path /usr/share/centreon                                   OK
Le script va ensuite vous demander le répertoire contenant les logs de Centreon :
Where is your Centreon log directory
default to [/usr/local/centreon/log]
> /var/log/centreon

Do you want me to create this directory ? [/var/log/centreon]
[y/n], default to [n]:
> y
Path /var/log/centreon                                     OK
Le script vous demande maintenant les différents répertoires des fichiers de configuration de Centreon :
Where is your Centreon etc directory
default to [/etc/centreon]
>

Do you want me to create this directory ? [/etc/centreon]
[y/n], default to [n]:
> y
Path /etc/centreon                                         OK

Where is your Centreon binaries directory
default to [/usr/local/centreon/bin]
> /usr/share/centreon/bin

Do you want me to create this directory ? [/usr/share/centreon/bin]
[y/n], default to [n]:
> y
Path /usr/share/centreon/bin                               OK

Where is your Centreon data informations directory
default to [/usr/local/centreon/data]
> /usr/share/centreon/data

Do you want me to create this directory ? [/usr/share/centreon/data]
[y/n], default to [n]:
> y
Path /usr/share/centreon/data                              OK

Where is your Centreon variable library directory?
default to [/var/lib/centreon]
>

Do you want me to create this directory ? [/var/lib/centreon]
[y/n], default to [n]:
> y
Path /var/lib/centreon                                     OK
/usr/bin/rrdtool                                           OK
/usr/bin/mail                                              OK
/usr/bin/php                                               OK

Where is PEAR [PEAR.php]
default to [/usr/share/php/PEAR.php]
>
Path /usr/share/php                                        OK
/usr/bin/perl                                              OK
Finding Apache user :                                      www-data
Finding Apache group :                                     www-data
Le script demande quel user/group utiliser :
What is the Centreon group ? [centreon]
default to [centreon]
>

What is the Centreon user ? [centreon]
default to [centreon]
>
Nous allons ensuite dire au script d’utiliser centreon-engine et centreon-broker ainsi que le chemin ou se trouve les Plugins :
What is the Monitoring engine user ?
> centreon-engine

What is the Broker user ? (optional)
> centreon-broker

What is the Monitoring engine log directory ?
> /var/log/centreon-engine

Where is your monitoring plugins (libexec) directory ?
default to [/usr/lib/nagios/plugins]
>
Path /usr/lib/nagios/plugins                            OK
Add group centreon to user www-data                        OK
Add group centreon to user centreon-engine                 OK
Add group centreon-engine to user www-data                 OK
Add group centreon-engine to user centreon                 OK
Le script vous demande le chemin du fichier de configuration de sudo ainsi que les chemins des différents modules :
------------------------------------------------------------------------
	Configure Sudo
------------------------------------------------------------------------

Where is sudo configuration file
default to [/etc/sudoers]
>
/etc/sudoers                                               OK

What is the Monitoring engine init.d script ?
> /etc/init.d/centengine

What is the Monitoring engine binary ?
> /usr/sbin/centengine

What is the Monitoring engine configuration directory ?
> /etc/centreon-engine

Where is the configuration directory for broker module ?
>  /etc/centreon-broker

Where is the init script for broker module daemon ?
> /etc/init.d/cbd
Your sudo is not configured

Do you want me to configure your sudo ? (WARNING)
[y/n], default to [n]:
> y
Configuring Sudo                                           OK
Le script va ensuite configurer le serveur web Apache :
------------------------------------------------------------------------
	Configure Apache server
------------------------------------------------------------------------

Do you want to add Centreon Apache sub configuration file ?
[y/n], default to [n]:
> y
Create '/etc/apache2/conf.d/centreon.conf'                 OK
Configuring Apache                                         OK

Do you want to reload your Apache ?
[y/n], default to [n]:
> y
Reloading Apache service                                   OK
Preparing Centreon temporary files
Change right on /var/log/centreon                          OK
Change right on /etc/centreon                              OK
Change macros for insertBaseConf.sql                       OK
Change macros for sql update files                         OK
Change macros for php files                                OK
Change macros for perl binary                              OK
Change right on /etc/centreon-engine                       OK
Add group centreon-broker to user www-data                 OK
Add group centreon-broker to user centreon-engine          OK
Add group centreon to user centreon-broker                 OK
Change right on /etc/centreon-broker                       OK
Copy CentWeb in system directory
Install CentWeb (web front of centreon)                    OK
Change right for install directory
Change right for install directory                         OK
Install libraries                                          OK
Write right to Smarty Cache                                OK
Copying libinstall                                         OK
Change macros for centreon.cron                            OK
Install Centreon cron.d file                               OK
Change macros for centAcl.php                              OK
Change macros for downtimeManager.php                      OK
Install cron directory                                     OK
Change right for eventReportBuilder                        OK
Change right for dashboardBuilder                          OK
Change macros for centreon.logrotate                       OK
Install Centreon logrotate.d file                          OK
Prepare centFillTrapDB                                     OK
Install centFillTrapDB                                     OK
Prepare centreon_trap_send                                 OK
Install centreon_trap_send                                 OK
Prepare centreon_check_perfdata                            OK
Install centreon_check_perfdata                            OK
Prepare centreonSyncPlugins                                OK
Install centreonSyncPlugins                                OK
Prepare centreonSyncArchives                               OK
Install centreonSyncArchives                               OK
Install generateSqlLite                                    OK
Install changeRrdDsName.pl                                 OK
Prepare export-mysql-indexes                               OK
Install export-mysql-indexes                               OK
Prepare import-mysql-indexes                               OK
Install import-mysql-indexes                               OK
Centreon Web Perl lib installed                            OK

------------------------------------------------------------------------
Pear Modules
------------------------------------------------------------------------
Check PEAR modules
PEAR                            1.4.9       1.9.5          OK
DB                              1.7.6                      NOK
DB_DataObject                   1.8.4                      NOK
DB_DataObject_FormBuilder       1.0.0RC4                   NOK
MDB2                            2.0.0                      NOK
Date                            1.4.6                      NOK
Archive_Tar                     1.1         1.3.12         OK
Auth_SASL                       1.0.1                      NOK
Console_Getopt                  1.2         1.3.1          OK
Net_SMTP                        1.2.8                      NOK
Net_Socket                      1.0.1                      NOK
Net_Traceroute                  0.21                       NOK
Net_Ping                        2.4.1                      NOK
Validate                        0.6.2                      NOK
XML_RPC                         1.4.5                      NOK
SOAP                            0.10.1                     NOK
Log                             1.9.11                     NOK
Archive_Zip                     0.1.2                      NOK

Do you want me to install/upgrade your PEAR modules
[y/n], default to [y]:
>  y
Le script va ensuite mettre à jour vos modules PEAR,
Upgrading PEAR modules
Installing PEAR modules
DB                              1.7.6       1.8.2          OK
DB_DataObject                   1.8.4       1.11.4         OK
DB_DataObject_FormBuilder       1.0.0RC4    1.0.2          OK
MDB2                            2.0.0       2.4.1          OK
Auth_SASL                       1.0.1       1.0.6          OK
Net_SMTP                        1.2.8       1.6.2          OK
Net_Traceroute                  0.21        0.21.3         OK
Net_Ping                        2.4.1       2.4.5          OK
Validate                        0.6.2       0.8.5          OK
XML_RPC                         1.4.5       1.5.5          OK
SOAP                            0.10.1      0.13.0         OK
Log                             1.9.11      1.12.8         OK
Archive_Zip                     0.1.2       0.1.2          OK
Check PEAR modules
PEAR                            1.4.9       1.9.5          OK
DB                              1.7.6       1.8.2          OK
DB_DataObject                   1.8.4       1.11.4         OK
DB_DataObject_FormBuilder       1.0.0RC4    1.0.2          OK
MDB2                            2.0.0       2.4.1          OK
Date                            1.4.6       1.4.7          OK
Archive_Tar                     1.1         1.3.12         OK
Auth_SASL                       1.0.1       1.0.6          OK
Console_Getopt                  1.2         1.3.1          OK
Net_SMTP                        1.2.8       1.6.2          OK
Net_Socket                      1.0.1       1.0.14         OK
Net_Traceroute                  0.21        0.21.3         OK
Net_Ping                        2.4.1       2.4.5          OK
Validate                        0.6.2       0.8.5          OK
XML_RPC                         1.4.5       1.5.5          OK
SOAP                            0.10.1      0.13.0         OK
Log                             1.9.11      1.12.8         OK
Archive_Zip                     0.1.2       0.1.2          OK
All PEAR modules                                           OK

------------------------------------------------------------------------
		Centreon Post Install
------------------------------------------------------------------------
Create /usr/local/centreon/www/install/install.conf.php    OK
Create /etc/centreon/instCentWeb.conf                      OK
ATTENTION !!! Si vous avez l’erreur :
XML_RPC 1.4.5 NOK
Rien de bien grave cela veut dire que le programme d’update de PEAR contient toujours le lien cassé pour XML_RPC.
Nous allons donc le mettre à jour manuellement :
Ouvrez un nouveau terminal ssh vers votre serveur Debian et lancez la commande :
pear install XML_RPC
Vous devriez avoir l’erreur suivante :
WARNING: "pear/XML_RPC" is deprecated in favor of "pear/XML_RPC2"
Could not download from "https://de.pear.php.net/get/XML_RPC-1.5.5.tgz", cannot download "pear/XML_RPC" (Connection to `de.pear.php.net:443' failed: )
Error: cannot download "pear/XML_RPC"
Download failed
install failed
Nous allons donc télécharger le fichier manuellement :
mkdir /usr/local/src/pear
wget http://download.pear.php.net/package/XML_RPC-1.5.5.tgz
pear install XML_RPC-1.5.5.tgz
Vous devriez avoir le message :
install ok: channel://pear.php.net/XML_RPC-1.5.5
Vous pouvez ensuite continuer l’installation en revenant sur votre premier terminal.
Une fois vos modules PEAR à jour, le script d’installation va s’occuper de CentStorage :
------------------------------------------------------------------------
	Start CentStorage Installation
------------------------------------------------------------------------

Where is your Centreon Run Dir directory?
default to [/var/run/centreon]
>

Do you want me to create this directory ? [/var/run/centreon]
[y/n], default to [n]:
> y
Path /var/run/centreon                                     OK

Where is your CentStorage binary directory
default to [/usr/share/centreon/bin]
>
Path /usr/share/centreon/bin                               OK

Where is your CentStorage RRD directory
default to [/var/lib/centreon]
>
Path /var/lib/centreon                                     OK
Preparing Centreon temporary files
/tmp/centreon-setup exists, it will be moved...
install www/install/createTablesCentstorage.sql            OK
Creating Centreon Directory '/var/lib/centreon/status'     OK
Creating Centreon Directory '/var/lib/centreon/metrics'    OK
Install CentStorage binary                                 OK
Change right : /var/run/centreon                           OK
Change macros for centstorage init script                  OK
Replace Centstorage default script Macro                   OK

Do you want me to install CentStorage init script ?
[y/n], default to [n]:
> n
CentStorage init script not installed, please use :
 /usr/share/centreon/INSTALL_DIR_CENTREONexamples/centstoraPASSEDt.d
Install logAnalyser                                        OK
Install logAnalyserBroker                                  OK
Install nagiosPerfTrace                                    OK
Change macros for centstorage.cron                         OK
Install CentStorage cron                                   OK
Change macros for centstorage.logrotate                    OK
Install Centreon Storage logrotate.d file                  OK
Create /etc/centreon/instCentStorage.conf                  OK
Installation du module CentCore :
------------------------------------------------------------------------
	Start CentCore Installation
------------------------------------------------------------------------

Where is your CentCore binary directory
default to [/usr/share/centreon/bin]
>
Path /usr/share/centreon/bin                               OK
Preparing Centreon temporary files
/tmp/centreon-setup exists, it will be moved...
Copy CentCore in binary directory                          OK
Change right : /var/run/centreon                           OK
Change right : /var/lib/centreon                           OK
Change macros for centcore.logrotate                       OK
Install Centreon Core logrotate.d file                     OK
Replace CentCore init script Macro                         OK
Replace CentCore default script Macro                      OK

Do you want me to install CentCore init script ?
[y/n], default to [n]:
> y
CentCore init script installed                             OK
CentCore default script installed                          OK

Do you want me to install CentCore run level ?
[y/n], default to [n]:
> y
update-rc.d: using dependency based boot sequencing
CentCore Perl lib installed                                OK
Create /etc/centreon/instCentCore.conf                     OK
Installation des plugins pour les traps SNMP :
------------------------------------------------------------------------
	Start CentPlugins Installation
------------------------------------------------------------------------

Where is your CentPlugins lib directory
default to [/var/lib/centreon/centplugins]
>

Do you want me to create this directory ? [/var/lib/centreon/centplugins]
[y/n], default to [n]:
> y
Path /var/lib/centreon/centplugins                         OK
Preparing Centreon temporary files
/tmp/centreon-setup exists, it will be moved...
Change macros for CentPlugins                              OK
Installing the plugins                                     OK
Change right on centreon.conf                              OK
CentPlugins is installed

------------------------------------------------------------------------
	Start CentPlugins Traps Installation
------------------------------------------------------------------------

Where is your SNMP configuration directory
default to [/etc/snmp]
>
/etc/snmp                                                  OK

Where is your CentreonTrapd binaries directory
default to [/usr/local/centreon/bin]
> /usr/share/centreon/bin/
/usr/share/centreon/bin/                                    OK
Finding Apache user :                                      www-data
Preparing Centreon temporary files
/tmp/centreon-setup exists, it will be moved...
Change macros for snmptrapd.conf                           OK
Replace CentreonTrapd init script Macro                    OK
Replace CentreonTrapd default script Macro                 OK

Do you want me to install CentreonTrapd init script ?
[y/n], default to [n]:
> y
CentreonTrapd init script installed                        OK
CentreonTrapd default script installed                     OK

Do you want me to install CentreonTrapd run level ?
[y/n], default to [n]:
> y
update-rc.d: using dependency based boot sequencing
trapd Perl lib installed                                   OK
Install : snmptrapd.conf                                   OK
Install : centreontrapdforward                             OK
Install : centreontrapd                                    OK
Create /etc/centreon/instCentPlugins.conf                  OK
###############################################################################
#                                                                             #
#                 Go to the URL : http://debian7.localmac/centreon/           #
#                   	     to finish the setup                              #
#                                                                             #
#                  Report bugs at http://forge.centreon.com                   #
#                                                                             #
#                         Thanks for using Centreon.                          #
#                          -----------------------                            #
#                        Contact : infos@centreon.com                         #
#                          http://www.centreon.com                            #
#                                                                             #
###############################################################################
Activez le site web Centreon et relancez Apache :
a2enconf centreon.conf
service apache2 reload
Création des dossier pour Centreon Broker :
mkdir /var/log/centreon-broker
chown centreon-broker:centreon-broker /var/log/centreon-broker
chmod 775 /var/log/centreon-broker
chmod 775 /var/lib/centreon-broker
Finalisation de l’installation via l’interface WEB :
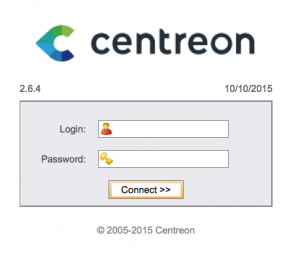
Ouvrez votre navigateur et allez à l’url :
http://VotreIpCentreon/centreon/
Cliquez sur Next
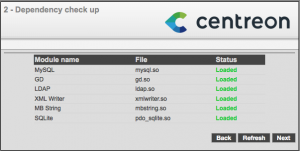
Validation des dépendances, cliquez sur Next

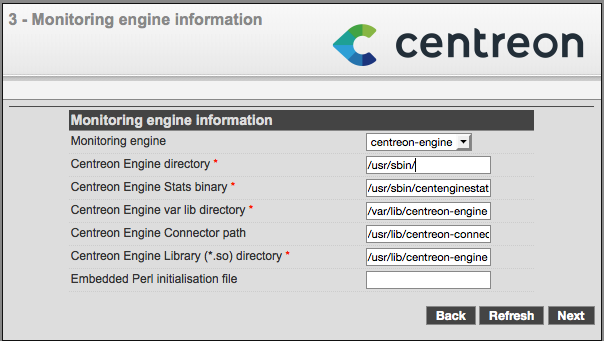
Choisissez centreon-engine comme moteur de supervision et parametrez les chemins suivants :
Centreon Engine directory:			/usr/sbin/
Centreon Engine Stats binary:			/usr/sbin/centenginestats
Centreon Engine var lib directory:		/var/lib/centreon-engine
Centreon Engine Connector path:			/usr/lib/centreon-connector
Centreon Engine Library (*.so) directory:	/usr/lib/centreon-engine/

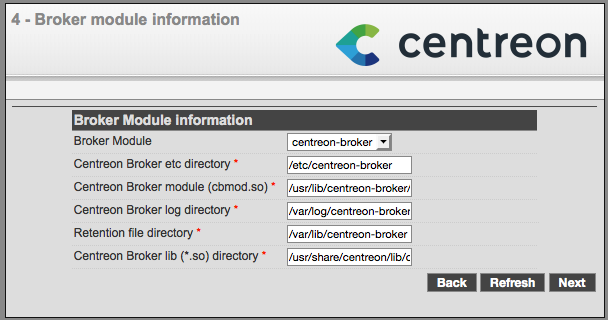
Choisissez centreon-broker comme broker et paramétrez les chemins suivants :
Centreon Broker etc directory:		/etc/centreon-broker
Centreon Broker module (cbmod.so):	/usr/lib/centreon-broker/cbmod.so
Centreon Broker log directory:		/var/log/centreon-broker
Retention file directory:		/var/lib/centreon-broker
Centreon Broker lib (*.so) directory:	/usr/share/centreon/lib/centreon-broker

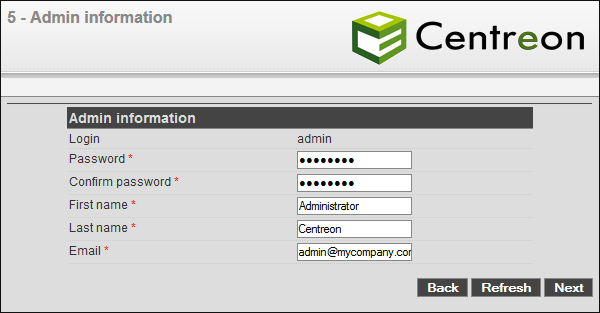
Création du compte admin

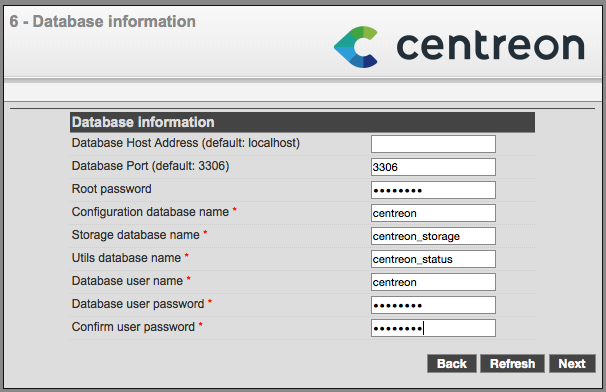
Paramétrage de la BDD
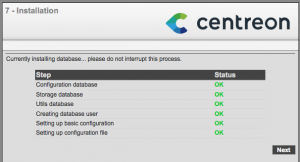
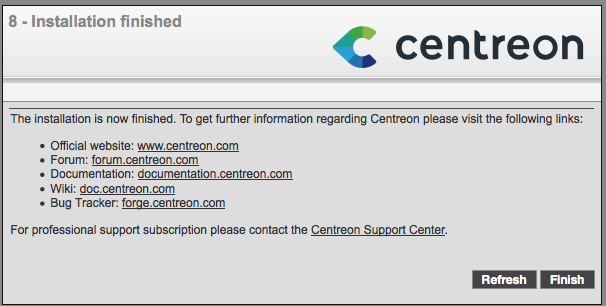
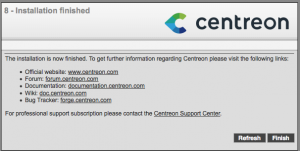
Installation et paramétrage de Centreon
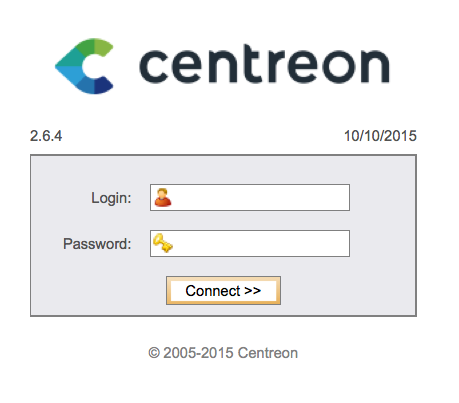
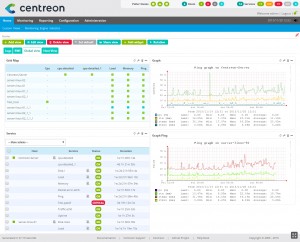
Vous etes maintenant prêt à ajouter vos équipements à monitorer !
Bon courage pour la suite ;)